


INTRODUCTION
Next.js is a powerful open source React framework. It enables features such as server-side rendering, API routes that you can use to build REST API endpoints within your Next.js app and consume it within the same app or any other app. This way, the frontend and backend can also be unified into a single codebase. Fauna’s database is well optimized for the JamStack through its API first approach while offering powerful and useful query features through its own query language (FQL). In this tutorial we will use Next.js and Fauna to build out a full stack Q&A application. This application will:
- Allow users to answer questions
- Get their scores in real time
Project Setup.
The recommended way to initialize a Next.js app is by using create-next-app which sets up everything automatically for you.
You will be required to either have yarn or npm installed.
yarn create next-app qna
If you prefer to use npx you can run the below equivalent command.
npx create-next-app qna
Once this is complete,cd into the folder.
cd qna
Basic Application Structure
├── package.json
├── pages
│   ├── api
│   ├── _app.js
│   └── index.js
├── public
│   ├── favicon.ico
│   └── vercel.svg
├── README.md
├── styles
│   ├── globals.css
│   └── Home.module.css
└── yarn.lock
Install the faunadb npm package to allow our application to interact with our Fauna Instance.
yarn add faunadb
Setup your Fauna database.
To store all our application’s data, we will first need to create a database. Fortunately, this is just a single command or line of code, as shown below. Don’t forget to create a Fauna account before continuing.
Fauna Shell
Fauna's API has various interfaces/clients, such as drivers in Javascript, Golang, Python, Java and more, a cloud console, local and cloud shells, and even a VS Code extension! For this article, we’ll start with the local Fauna Shell, which is almost 100% interchangeable with the other interfaces.
You will first be required to install the Fauna shell on your machine with the following command.
npm install -g fauna-shell
After installing the Fauna Shell with npm or yarn, log in with your Fauna credentials using the fauna cloud-login command:
$ fauna cloud-login
For email login, enter your email below, and then your password.
For login with 3rd-party identity providers like Github or Netlify, please acquire a key from
Dashboard > Security and enter it below instead.

Email: email@example.com
Password: **********
Now we are able to create our database.
fauna create-database qna
Create Collections and Indexes.
To start a shell with your new database, run:
fauna shell qna
We can now operate our database from this shell.
$ fauna shell qna
Starting shell for database qna
Connected to https://db.fauna.com
Type Ctrl+D or .exit to exit the shell
qna>
In the case of our application, we will have two collections.
- Questions - This will hold information about the questions.
- Answers - The responses provided by the users. We will also use this collection to grade the responses.
Creating collections
To create our questions collection, run the following command in the shell to create the collection with the default configuration.
qna> CreateCollection({ name: "questions" })
Next, let’s do the same for the answers collections.
qna> CreateCollection({ name: "answers" })
Expected Output

DATA SCHEMA
Questions Collection
Each question will have the following fields question_text - A questions eg. “Does Next.js support SSR or SSG?” correct_answer - The correct answer to the question asked in (1) eg. “Both” options - Distractors to the correct answer eg. [“SSR”, “SSG”]
Answers Collection
Each question response (answer) will have the following fields
- question_id - a reference to the question in the questions collection.
- user_id - A unique identifier for the respondent.(This value will be automatically generated and stored in the browser.)
- response - The user’s response from a list of possible options.
- isCorrect - A Boolean value to indicate it the answer provided is their correct (true) or incorrect (false)
INDEXING YOUR DATA.
Fauna highly recommends indexing your data for the purposes of searching, sorting and combining results from multiple collections.
In this Q&A app, a user will be allowed to attempt and respond to a question only once. We can enforce this constraint in our answers collection by creating an index as follows.
qna> CreateIndex({
...   name: "unique_question_user",
...   unique: true,
...   serialized: true,
...   source: Collection("answers"),
...   terms: [
...     {
.....       field: ["data", "user_id"]
.....     },
...     {
.....       field: ["data", "question_id"]
.....     }
...   ]
... })
If the index was created successfully, you should get a similar response.
#SAMPLE RESPONSE…...
{
  ref: Index("unique_question_user"),
  ts: 1610301037970000,
  active: true,
  serialized: true,
  name: 'unique_question_user',
  unique: true,
  source: Collection("answers"),
  terms: [
    { field: [ 'data', 'user_id' ] },
    { field: [ 'data', 'question_id' ] }
  ],
  partitions: 1
}
The second index we will create is to enable us get all answers by a particular user
READING AND SAVING DATA
Next.js supports multiple ways or obtaining data from the remote source eg. API or a database.
Use of getServersideProps. This props can thereafter be passed to the exported component
Using API Routes - API routes provide a straightforward solution to build your API with Next.js.Any file inside the folder pages/api is mapped to /api/* and will be treated as an API endpoint instead of a page. They are server-side only bundles and won't increase your client-side bundle size.
Now that we know about API Routes, let's create an HTTP endpoint to allow us to create a question with a simple POST request.
In the root of our application directory, in the pages/api folder, lets create a file named createQuestion.js and add the following code.
// Next.js API route support: https://nextjs.org/docs/api-routes/introduction
import faunadb, {query as q} from 'faunadb';
const client = new faunadb.Client({secret: process.env.FAUNA_SECRET })

export default async (req, res) => {
   if(req.method == 'POST'){
       let {question_text, correct_answer, options } = req.body
       let results = await client.query(
           q.Create(q.Collection('questions'),
           { data : {question_text, correct_answer, options}})
       )
       console.log(results)
       res.json({ id: results.ref.id, data: results.data })
   }
 }
CREATE A FAUNA KEY
In order for our application to send and receive data to Fauna we will need to create a key and provide its secret when performing queries. For this application, a key with a Server Role is sufficient to create, read and delete data. Head over to your database’s Fauna Shell and create a key using the following command.
CreateKey({
      name: "qna-app",
      role: "server"
   })
# Example result.
# NOTE: Make sure you copy and store the secret!
# {
#   ref: Ref(Keys(), "280185139463529993"),
#     ts: 1603464278974000,
#     role: 'server',
#     secret: 'fnAD62i0bTBCDRjYjkcttAsY3wVyfsvynwUSqxYG',
#     hashed_secret: ...
# }
This next step is critical. Copy the secret generated and set it on your project environment by running the command below. Note that secrets are only shown once after creating keys; you’ll have to create a new key if you lose the original secret.
Create a .env.local file in the application root, and here we will place this key
# .env.local
FAUNA_SECRET=fn……………………………….
Once you are done we can start our development server by running
$ yarn dev
SEED INITIAL QUESTIONS
Now that we have an API running at 127.0.0.1:3000/api/createQuestion we can seed some initial questions to our database by using simple curl commands.
$ curl --location --request POST 'http://127.0.0.1:3000/api/createQuestion' \
--header 'Content-Type: application/json' \
--data-raw '{
    "question_text":"How many items in a dozen?",
    "correct_answer": "12",
    "options": ["6", "10"]
}'
$ curl --location --request POST 'http://127.0.0.1:3000/api/createQuestion' \
--header 'Content-Type: application/json' \
--data-raw '{
    "question_text":"How many bits in a byte?",
    "correct_answer": "8",
    "options": ["6", "10", "12", "16" ]
}'
Let’s also create an API endpoint that can be used to evaluate question response.
In the pages/api folder, let's create a file named evaluateResponse.js and add the following code.
This API endpoint will be available at 127.0.0.1:3000/api/evaluateResponse and shall be invoked whenever a users response needs to be evaluated.
// Next.js API route support: https://nextjs.org/docs/api-routes/introduction
import faunadb, {query as q} from 'faunadb';
const client = new faunadb.Client({secret: process.env.FAUNA_SECRET })

export default async (req, res) => {
   if(req.method == 'POST'){
       let {question_id, user_id, answer } = req.body
       if (!(question_id && answer && user_id)){
           res.json({ error: "Fields question_id & answer & user_id should be provided." })
       }
       else {
           let results = await client.query(
               q.Get( q.Ref(q.Collection('questions'), question_id)))
           let question = results.data
           let isCorrect = false
           if ( question.correct_answer === answer ){ isCorrect = true }
           try{
               let query = await client.query(
                   q.Create(q.Collection('answers'),
                       { data : { question_id, user_id, isCorrect: isCorrect, response: answer }})
               )
               query.data.correct = question.correct_answer
               res.json({ ref: query.ref.id, data: query.data })
           }catch(error){
               if(error.message === 'instance not unique'){
                   res.json({error: 'Question is already answered'})
               }
           }
   }
 }
}
We can now start working on the UI.
To create a UI quickly, we will use the react-bootstrap library and use some ready made UI components.
$ yarn add react-bootstrap bootstrap
Next, add the change the default style in the pages/_app.js file to bootstrap as shown.
// pages/_app.js

import 'bootstrap/dist/css/bootstrap.min.css'

function MyApp({ Component, pageProps }) {
 return <Component {...pageProps} />
}

export default MyApp
USERS
As noted above, we will be required to uniquely identify users sowe will generate random user ids that will be saved in the cookies. We will use nookies to easily create and read cookie data.
yarn add nookies
getServerSideProps
Our cookies will be generated and set in the serverSideProps of our index.js.
If the cookies are available, they will be used to save user responses and also identify already attempted questions to prevent them from being loaded to the user again.
// pages/index.js
let cookies = parseCookies(context)
 if(!cookies.user_id){
   setCookie(context, 'user_id', `${rw()}${Math.floor((Math.random() * 999) + 900)}`, {
     maxAge: 7 * 24 * 60 * 60, path: '/', })
 }
In the same function, we will also retrieve a not attempted question from our questions collection in Fauna using the FQL Difference function This will enable us to compare the entire collections of questions that are missing from a list of questions that have already been attempted by the user. This will enable us to select the next question for the user.
We will use the following FQL query.
// pages/index.js
let query = await db.query(
   q.Difference(
     //Get All questions
     q.Select('data', q.Map(
       q.Paginate(q.Documents(q.Collection('questions'))), q.Lambda('ref', q.Var('ref')))),
     //Get  Attempted Questions
     q.Select('data', q.Map(
       q.Paginate( q.Match(q.Index('questions_attempted_by_user'), cookies.user_id)),
       q.Lambda('question_id', q.Ref(q.Collection('questions'), q.Var('question_id')))
     ))
   )
 )
Finally, update the pages/index.js file to be as below.
import Head from 'next/head'
import React, { useState, useEffect } from 'react'

import { parseCookies, setCookie, destroyCookie } from 'nookies'

import faunadb, {query as q} from 'faunadb';
const db = new faunadb.Client({secret: process.env.FAUNA_SECRET })
import rw from 'random-words'

//Bootstrap Components
import Card from 'react-bootstrap/Card'
//Import Custom Components
import Question from '../components/Question'

export default function Home( { question, auth } ) {

 let [questionId, setQuestionId] = useState(null)
 let [userId, setUserId] = useState(null)
 let cookies = parseCookies()

 return (
   <div className="container">
     <h5 style={{paddingTop:"3em"}}>🤔 Questions need answers</h5>
     <hr/>
     <Card>
       <Card.Header>
         <h5 style={{float:'right'}}>Hello {cookies.user_id}</h5>
       </Card.Header>

           <Question question={ question } />

       <p></p>
     </Card>
     <Card.Footer>
     </Card.Footer>
   </div>
 )
}

export async function getServerSideProps(context) {
 //Check for cookies and setCookie if none
 let cookies = parseCookies(context)
 if(!cookies.user_id){
   setCookie(context, 'user_id', `${rw()}${Math.floor((Math.random() * 999) + 900)}`, {
     maxAge: 7 * 24 * 60 * 60, path: '/', })
 }

 // Fetch questions
 let query = await db.query(
   q.Difference(
     //All questions
     q.Select('data', q.Map(
       q.Paginate(q.Documents(q.Collection('questions'))), q.Lambda('ref', q.Var('ref')))),
     // Attempted Questions
     q.Select('data', q.Map(
       q.Paginate( q.Match(q.Index('questions_attempted_by_user'), cookies.user_id)),
       q.Lambda('question_id', q.Ref(q.Collection('questions'), q.Var('question_id')))
     ))
   )
 )

 let question = null
 if(query.length > 0){
   let result = await db.query(q.Get(query[0]))
   question = result.data
   question.id = result.ref.id
 }

 return {
   props: {
     question,
   }, // will be passed to the page component as props
 }
}
Then create a components folder and in the ./components/Question.jsx add the following code for our question’s component.
import React, {useState} from 'react'
import Card from 'react-bootstrap/Card'
import Form from 'react-bootstrap/Form'
import Button from 'react-bootstrap/Button'
import { parseCookies } from 'nookies'
import {useRouter} from 'next/router'
import Alert from 'react-bootstrap/Alert'

export default function Question({ question }){

   let [answer, setAnswer ] = useState(null)
   let [evaluated, setEvaluated] = useState(null)

   let router = useRouter()
   let cookies = parseCookies()
   let user_id = cookies.user_id

   let submitResponse = async () => {
       let request = await fetch('/api/evaluateResponse', {
           headers:{ 'Content-Type': 'application/json'},
           body: JSON.stringify({ question_id: question.id, user_id: user_id, answer: answer}),
           method: "POST",
       })
       let response = await request.json()
       setEvaluated(response.data)
       setTimeout(function(){
           setEvaluated(null)
           router.push('/')}, 2500)
   }

   return(
       <>
       {evaluated ? <Alert variant="info">You answer was {evaluated.isCorrect ?
           "correct": `wrong. Correct answer is ${evaluated.correct}`}</Alert> : <></>}
       {question ? <Card.Body>
           <h4>{question.question_text}</h4>
           <hr/>
           {(question.options.concat(question.correct_answer)).map((answer, idx)=>{
               return ( <h4 key={idx}>
                           <Form.Check type="radio"
                               onChange={e => {setAnswer(e.target.value)}}  value={answer} name="options" label={answer} />
                        </h4> )
           })}
           <div className="container">
               {   answer ?
                   <Button className="col-sm-12 col-lg-12 col-md-12" variant="warning" onClick={submitResponse}>Answer</Button> :
                   <Button className="col-sm-12 col-lg-12 col-md-12" variant="warning" disabled>Answer</Button>
               }
           </div>
       </Card.Body> : <h4>You have answered all available questions.</h4>
       }
       </>
   )
}
When we run the dev server
yarn dev
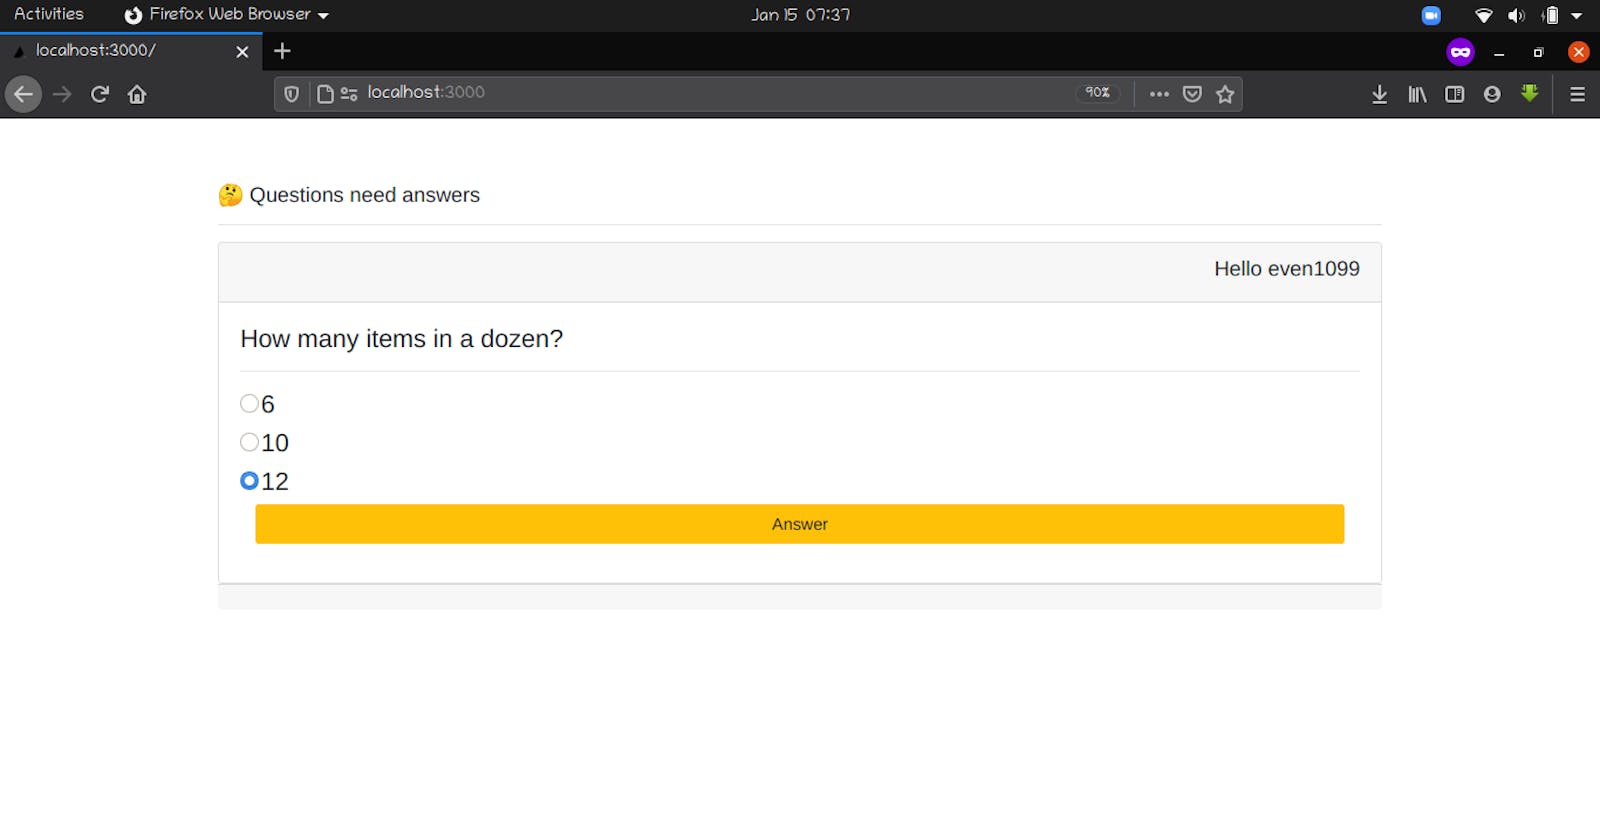
When you visit http://localhost:3000 you will be greeted with the questions page as shown below.

Deploy to Vercel
To deploy our app to Vercel, we first need to install the Vercel CLI by running the following command.
npm i -g vercel
Ensure you have a Vercel account, or head over to vercel.com to create one. Once registered, run the following command to login to the CLI with your account.
vercel login
Follow the prompts to confirm your email. Once you successfully login, run the following command to setup and deploy the app to Vercel.
vercel
$ vercel
Vercel CLI 20.1.1
? Set up and deploy “~/x/qna”? [Y/n] y
? Which scope do you want to deploy to? Bryan
? Link to existing project? [y/N] n
? What’s your project’s name? qna
? In which directory is your code located? ./
Auto-detected Project Settings (Next.js):
- Build Command: `npm run build` or `next build`
- Output Directory: Next.js default
- Development Command: next dev --port $PORT
? Want to override the settings? [y/N] n

🔍  Inspect: https://vercel.com/amolo/qna/ikxz9cpa2 [5s]
✅  Preview: https://qna.amolo.vercel.app [copied to clipboard] [48s]
📝  To deploy to production, run `vercel --prod`
Next we will need to add the FAUNA_SECRET environment variable to allow our app interact with Fauna.
vercel env add
Follow the prompts as shown below
$ vercel env add
Vercel CLI 20.1.1
? What’s the name of the variable? FAUNA_SECRET
? What’s the value of FAUNA_SECRET? [hidden]
? Add FAUNA_SECRET to which Environments (select multiple)? Production, Preview,
 Development
✅  Added Environment Variable FAUNA_SECRET to Project qna [2s]
Finally we can deploy our app with
vercel --prod
$ vercel --prod
Vercel CLI 20.1.1
🔍  Inspect: https://vercel.com/amolo/qna/co2hv7ces [2s]
✅  Production: https://qna-seven.vercel.app [copied to clipboard] [35s]
Your app is now live. You can visit the demo on https://qna-seven.vercel.app
Conclusion
For this tutorial, we are able to see how fast it can be to develop a full stack application with Fauna and Next.js. Next.js provides a highly productive, powerful and fast framework that we can use to develop both backend and frontend components of our full stack app. Secondly, we can see how Fauna is indeed a powerful database; with a powerful FQL, which supports complex querying and integration with the serverless and JAMStack ecosystem through its API first approach. This enables developers to simplify code and ship faster.
I hope you find Fauna to be exciting, like I do, and that you enjoyed this article. Feel free to follow me on Twitter @theAmolo if you enjoyed this!
All code written for this tutorial can be found in the following Github Repo